Sticking a Decal on Your Car Without Damaging the Paint: Full Guide
Sticking a decal on your car — whether it is a QR code, an NFC sticker, a decorative graphic or a low-emission vignette — scares many owners: fear of leaving a mark, peeling paint, glue residue. Good news: if you follow these rules, there is zero risk for your bodywork.
1. Pick the right adhesive
Not all adhesives are equal. Three main families:
- Repositionable acrylic adhesive (the default safe choice). Lasts 3 to 7 years, removes cleanly. Reference brands: 3M Controltac, Avery MPI 1105, Oracal 651.
- Permanent acrylic adhesive. Lasts 5 to 10 years, perfect for windshields (QR codes, low-emission stickers). Harder to remove but does not peel paint when removed correctly (see section 5).
- Low-end rubber adhesive (avoid). This is the one that leaves yellow marks or peels paint after a few months in the sun. Recognisable by its low price (< €1) and its smell.
Simple rule: if the sticker goes on the outside of a car, the spec must say "acrylic adhesive" and UV-resistant.
2. Prepare the surface (the step that changes everything)
90% of detachments come from a poorly prepared surface. The procedure:
- Wash the area with warm soapy water (Marseille soap or car shampoo). Avoid dish soap — it leaves a film.
- Rinse with clean water.
- Degrease with 70-99% isopropyl alcohol (pharmacy, ~€5 a bottle). This is the key step: without degreasing, the adhesive will not bond.
- Dry completely with a clean microfibre cloth.
- Wait 5 minutes for the alcohol to fully evaporate.
Work at room temperature (15 to 25 °C): too cold and the adhesive will not bond; too hot and it sets before you finish positioning.
3. Pick the right spot
Not all areas are equal:
| Area | Recommendation |
|---|---|
| Windshield (inside, top-right) | ✅ Ideal for QR / NFC / vignette. Visible, readable, sheltered. |
| Rear window (inside) | ✅ Good for QR. Avoid if you have a fragile electric defroster. |
| Plastic bumper | ⚠️ OK if paint is in good shape. Avoid raw plastic (glue migrates). |
| Wing / hood / door (paint) | ⚠️ OK with quality acrylic adhesive. Test for 24 h first. |
| Matte plastic or rubber (seals, trim) | ❌ Avoid — glue migrates, permanent mark. |
| Carbon wrap, existing vinyl | ❌ Risk of tearing the existing coating off. |
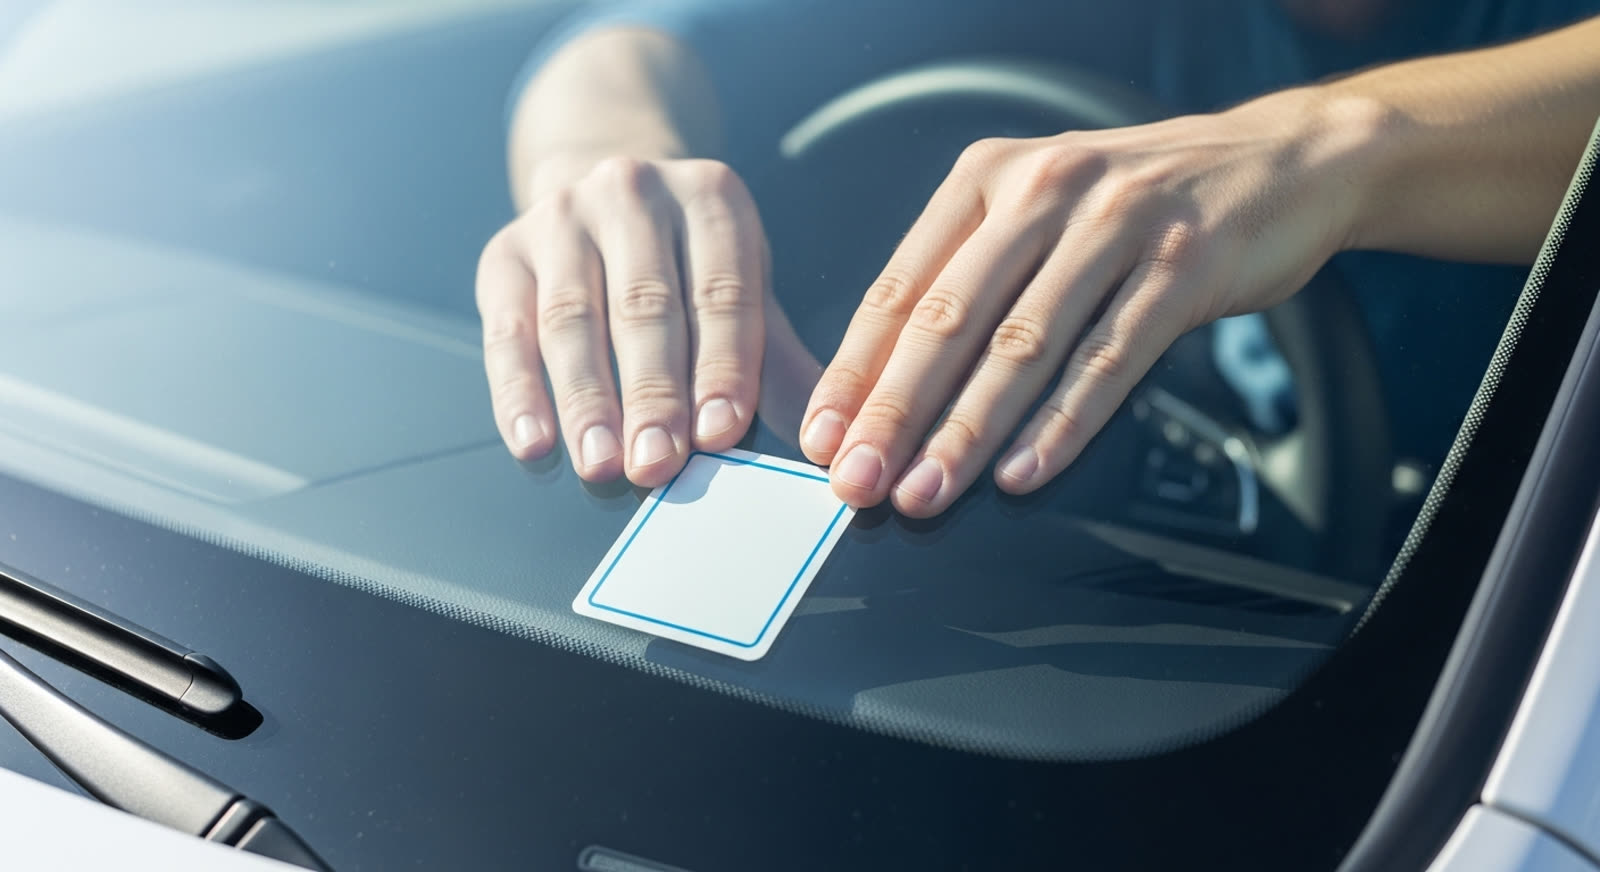
4. Apply the sticker correctly
- Dry-position first (with the protective film still on) to confirm placement with a visual reference (mirror, seal).
- Peel the backing from one corner, not by ripping it all at once.
- Apply from the centre outward while squeezing out bubbles with a felt squeegee (or a credit card wrapped in a soft cloth).
- Press firmly for 30 seconds across the whole surface.
- Avoid washing the car for 48 h — the adhesive needs that time to reach maximum bond strength.
5. How to remove a sticker cleanly (the moment of truth)
A correctly applied sticker always removes cleanly if you follow these steps:
- Heat the sticker with a hairdryer (15-20 cm distance, hot mode) for 30 to 60 seconds.
- Peel slowly at 45°, never at 90° (which tears the paint).
- Remove glue residue with:
- vegetable oil (gentle but slow),
- WD-40 (effective, rinse afterwards),
- or a dedicated product like Goo Gone or 3M Citrus Cleaner (the cleanest).
- Wash and polish the area — the paint is intact.
Never use: acetone, nail polish remover, gasoline — they attack the clearcoat.
Recap
- ✅ Quality acrylic adhesive (3M, Avery, Oracal)
- ✅ Surface degreased with isopropyl alcohol
- ✅ Applied at 15-25 °C, well squeegeed, wait 48 h before washing
- ✅ Removal with hairdryer + WD-40 or Goo Gone
With these rules, you can stick a Klaxie QR sticker, a low-emission vignette or any decal with zero risk to your paint.
See the Klaxie QR sticker — 3M acrylic adhesive, 7-year repositionable, guaranteed mark-free on removal.
Read next: How to print and stick your QR code · QR code on windshield: is it legal?